Python面向对象进阶学习
发表于更新于
字数总计:1.7k阅读时长:7分钟阅读量: 长沙
公共属性
使用id()可以查看,公共属性的地址是一样的。
Dog.d_type = '藏獒' 一旦更改,其他的实例对应属性也会随之更改。
1
2
3
4
5
| class Dog:
d_type = '京巴'
def say_hi(self):
print('hello, i am a dog, my type is ', self.d_type)
|
好处是可以节省内存空间。
重写父类的方法
继承父类方法后,需要重写父类方法,并调用父类方法的话。
可以用到super函数
1
2
3
4
5
6
7
8
9
10
11
12
13
14
15
16
17
18
19
20
21
22
23
| class Animal:
def __init__(self, name, age, sex):
self.name = name
self.age = age
self.sex = sex
def eat(self):
print('%s is eating..' % self.name)
class Person(Animal):
def __init__(self, name, age, sex, lover):
super(Person, self).__init__(name, age, sex)
self.lover = lover
def eat(self):
super(Person, self).eat()
print('人类不需要吃饭!')
p = Person('zhangly', 13, 'M', 'JayChou')
p.eat()
|
eat函数中的两种方式都可以行,如果是多继承,使用super的情况下,会一次执行eat 。
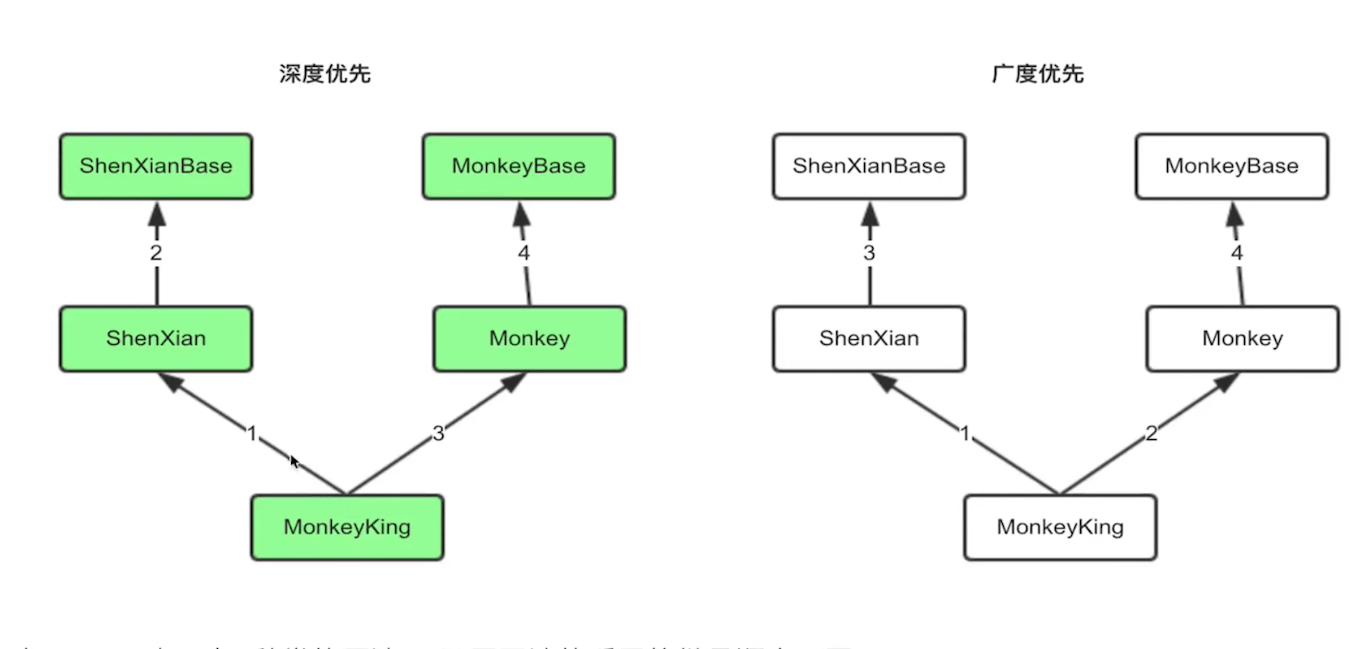
多继承的顺序
多继承在遇到重复的方法时,会采用以下两种查找方式:

在Python中,有两种类的写法,不同的写法采用的继承顺序不同。
1
2
3
4
5
| class A:
pass
class B(object):
pass
|
Python2中:经典类采用的是深度优先,新式类采用广度优先。
Python3中:都是采用广度优先。
不过在实际测试后,Python使用的是一种C3的算法。
既不是深度优先,也不是广度优先。
类里面有一个方法可以打印出类的继承顺序:
1
2
3
4
5
6
7
8
9
10
11
12
13
14
| class A:
pass
class B(A):
pass
class C(A):
pass
class D(B, C):
pass
print D.mro()
|
私有属性
1
2
3
4
5
6
7
8
9
| class A:
def __init__(self, name):
self.name = name
self.__age = 10
a = A('tutu')
print(a.__age)
a._A__age = 30
|
私有方法
1
2
3
4
5
6
7
8
9
10
11
| class A:
def __init__(self, name):
self.name = name
self.__age = 10
def __check(self):
print('here is check: ', self.name)
a = A('tutu')
a.__check()
a._A__check()
|
多态
比如一个对象会有许多种表现形式,比如网站页面有个按钮(单选框,多选框,圆角点击按钮),
它们都一个onClick()方法。
这种多个对象公用一个接口,又表现的形态不一样的现象,就叫做多态。
下面是几个例子:
1.通过统一函数接口实现多态
1
2
3
4
5
6
7
8
9
10
11
| class Dog(object):
def sound(self):
print('汪汪汪')
class Cat(object):
def sound(self):
print('喵喵喵')
def make_sound(animal_obj):
"""统一调用接口"""
animal_obj.sound()
|
2.通过抽象类实现多态(常见用法)
1
2
3
4
5
6
7
8
9
10
11
12
13
14
15
16
17
18
19
20
21
22
23
24
| class Document:
def __init__(self, name):
self.name = name
def show(self):
raise NotImplementedError('Subclass must implement abstract method!')
class Pdf(Document):
def show(self):
return 'Show pdf contents!'
class Word(Document):
def show(self):
return 'Show word contents!'
documents = [Pdf('Document1'),
Pdf('Document2'),
Word('Document3')
]
for doc in documents:
print(doc.name, ': ', doc.show())
|
类变量和实例变量的区别
1
2
3
4
5
6
7
8
9
10
11
12
13
| class Dog:
name = 'stupid dog'
def __init__(self, name):
self.name = name
@classmethod
def eat(cls):
print('dog {0} is eating..'.format(cls.name))
d = Dog('ly')
d.eat()
|
如果添加了classmethod,则代表函数下使用的是类变量。
这里举一个例子会用到类变量的情况:
有一个Student的类,每当实例化一个s1需要有一个变量记录学生的总数。
1
2
3
4
5
| class Student(object):
stu_num = 0
def __init__(self, name):
self.name = name
Student.stu_num += 1
|
property相关
value.setter 可以set值
value.deleter 可以删除值
面向对象的反射
简而言之,可以通过字符串的形式来操作对象的属性。
比如一个例子,来判断对象是否有某个属性:
1
2
3
4
5
6
7
8
9
10
11
| class Person:
def __init__(self, name, age):
self.name = name
self.age = age
p1 = Person('zhang', 22)
if hasattr(p1, 'name2'):
print('ok')
else:
print('not ok')
|
除此之外还有几个方法:
getattr(obj, name) 获取某个属性
setattr(obj, name, value) 设置某个属性
delattr(obj, name) 删除某个属性
比如根据用户输入来获取要执行的方法:
1
2
3
4
| user_command = input('>>:').sprip()
if hasattr(p1, user_command):
func = getattr(p1, user_command)
func()
|
动态的加载模块
使用__import()__ 方法。
Python官方推荐的方法是:
1
2
| import importlib
importlib.import_module('os')
|
反射的高级用法
例子:
根据用户输入选取页面,一个常规写法。
1
2
3
4
5
6
7
8
9
10
11
12
13
14
15
16
17
18
19
20
21
22
23
|
class User:
def login(self):
print('欢迎来到登陆页面')
def register(self):
print('欢迎来到注册页面')
def save(self):
print('欢迎来到存储页面')
while True:
choose = input('>>>').strip()
if choose == 'login':
obj = User()
obj.login()
elif choose == 'register':
obj = User()
obj.register()
elif choose == 'save':
obj = User()
obj.save()
|
如果使用反射:
1
2
3
4
5
6
| u = User()
while True:
choose = input('>>>').strip()
if hasattr(User, choose):
func = getattr(u, choose)
func()
|
单例模式
__new__方法,在__init__方法之前执行。
1
2
3
4
5
6
7
8
9
10
| class Student:
def __init__(self, name):
self.name = name
print('init {0}'.format(self.name))
def __new__(cls, *args, **kwargs):
return object.__new__(cls)
p = Student('Alex')
|
使用__new__方法来实现单例模式(不管实例化对象几次,都只有一个实例)
1
2
3
4
5
6
7
8
9
10
11
12
13
14
15
16
17
18
|
class Printer(object):
task = []
instance = None
def __init__(self, name):
self.name = name
def add_task(self, job):
self.task.append(job)
print('{0} 添加任务{1}到打印机,任务总数为:{2}')
def __new__(cls, *args, **kwargs):
if cls.instance is None:
obj = object.__new__(cls)
cls.instance = obj
return cls.instance
|
__call__方法
调用实例化对象,或者类的时候,执行的方法。
1
2
3
4
5
6
7
8
9
10
| class School:
def __init__(self, name):
self.name = name
def __call__(self, *args, **kwargs):
print(self.name)
s = School('ly')
s()
|
动态的创建一个类
使用type方法
1
2
3
| dog_class = type('Dog', (object,), {'role': 'dog'})
d = dog_class()
print d.role
|
如果想要加上构造函数
1
2
3
4
5
6
7
| def __init__(self, name, age):
self.name = name
self.age = age
dog_class = type('Dog', (object,), {'role': 'dog', '__init__': __init__})
d = dog_class('dahuang', 12)
print d.name
|
对象的判断
判断一个对象是否属于某个类
1
2
3
4
5
| class Foo(object):
pass
obj = Foo()
isinstance(obj, Foo)
|
判断一个类是否是另一个类的派生类
1
2
3
4
5
6
7
| class Foo(object):
pass
class Bar(Foo):
pass
issubclass(Bar, Foo)
|
异常处理
1
2
3
4
5
6
7
8
9
10
| while True:
num1 = input('num1:')
num2 = input('num2:')
try:
num1 = int(num1)
num2 = int(num2)
result = num1 + num2
except Exception as e:
print '出现异常,信息如下:'
print e
|
几种用法:
1
2
3
4
5
6
7
8
9
10
11
12
13
14
15
16
17
|
try:
print '一个程序'
except Exception:
print '处理异常'
else:
print '没有发生任何异常执行这里'
try:
print '一个程序'
except Exception:
print '处理异常'
else:
print '没有发生任何异常执行这里'
finally:
print '不管有没有发生异常都执行'
|
主动触发异常,使用raise语法。
自定义一个异常
1
2
3
4
5
6
7
| class YoutubeConnectionError(BaseException):
def __init__(self, msg):
self.msg = msg
def __str__(self):
return self.msg
|
断言
判断代码是否符合执行预期
1
2
| assert type(1) is int
assert len([1,2,3]) == 2
|